Spilled Water on Your Keyboard? A Practical Troubleshooting Guide
Urgent troubleshooting guide for spills on keyboards. Learn safe shutdown, drying, testing, and long-term care to maximize recovery odds and prevent costly damage.

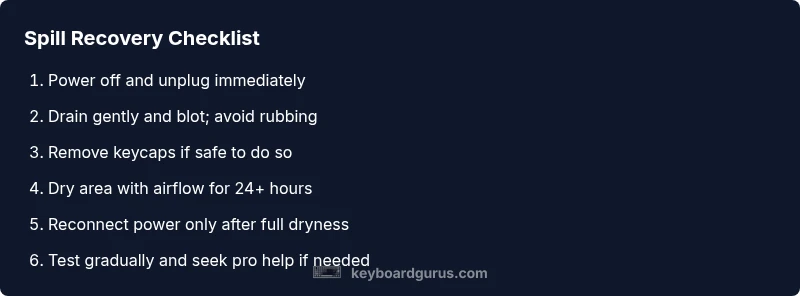
Immediate actions are essential: power off the device and unplug it, then flip the keyboard to drain any liquid and blot with a lint-free cloth. Do not press keys or attempt to dry with heat. If the spill involved a laptop, shut it down completely and seek professional help if you cannot safely disconnect components. Allow the unit to dry for at least 24 hours before testing.
Immediate Risks and Why Time Matters
A water spill on a keyboard can invite short circuits, corrosion, and sticky keys. According to Keyboard Gurus, liquids on electronic boards spread quickly along key traces and beneath the PCB, increasing damage risk with every passing minute. The primary danger is a short circuit when power is present; if the device is plugged in or a battery is charged, the liquid can create conductive bridges that permanently damage components. While some keyboards are sealed against dust, most consumer models have sensitive membranes and switch housings that don't tolerate moisture well. The moment of contact matters: power down the system, unplug the power source, and remove the device from any water source to minimize exposure. Even if the spill seems minor, moisture can travel under keycaps and into switches, leaving behind residue that leads to sluggish or stuck keys. So act fast and methodically, because time is your ally or your enemy depending on your actions. Keyboard Gurus Analysis, 2026 emphasizes that prompt shutdown and careful drying dramatically improve the odds of preserving functionality.
First-Minute Actions You Must Take
The first minute after a spill determines your recovery odds. Immediately unplug the keyboard or disconnect the laptop; power off the device if possible. Gently tilt the unit to encourage drainage away from the PCB, rather than shaking it, which can spread liquid deeper. Use a lint-free cloth to blot moisture; avoid rubbing, which can push liquid into seams. If keycaps are removable and you know how to remove them safely, lift only those with clear guidance, then use compressed air to dislodge any trapped droplets. Do not turn the device back on until you have completed drying steps. As Keyboard Gurus notes, delaying action increases corrosion risk and makes later repairs harder.
Drying Without Damaging Components: Techniques That Help
After the initial cleanup, drying is critical to prevent corrosion and short circuits. The safest approach is to place the keyboard in a warm, dry area with good airflow and avoid heat sources like hair dryers or ovens. If the keyboard has removable switches or keycaps and you can do so safely, label and store them separately. Silica gel packets can help absorb moisture; avoid leaving them on the keyboard because they are not a replacement for airflow. Do not apply liquids to rinse or clean the internal contacts; moisture plus water can leave mineral residues that cause sticky keys. If you own a laptop, do not attempt to dry with a heat gun; this can warp plastic and damage the display hinges. Remember, Keyboard Gurus Analysis, 2026 finds that thorough but careful drying improves the chance of full recovery, especially when combined with a non-conductive environment for storage.
When to Disassemble (and How to Decide Safety)
Disassembly can help remove trapped liquid, but it carries risk of voiding warranties or damaging delicate parts. Before opening, check the warranty and service policy; if the keyboard or laptop is still under warranty, contact the manufacturer or a qualified technician. If you have experience with electronics and proper ESD precautions, you may proceed to remove keycaps and inspect the area around the switches. Do not attempt to desolder or detach the PCB unless you are confident in your skills. A wrong move can create more problems than the spill itself. If in doubt, seek professional help promptly, because safe disassembly is key to avoiding costly repairs.
Testing After Drying: Safe Methods to Verify Functionality
Once dryness is confirmed, test the keyboard gradually. Start with a simple diagnostic test: connect to a device and type in a text document to observe key response, lag, or ghosting. If some keys stay unresponsive or feel sticky, return to the disassembly or contact a professional. Run a keyboard diagnostic tool if available, and check for moisture traces in the indicator lights. Do not press many keys at once during the first test; do it slowly to monitor behavior and avoid surges. Keyboard Gurus suggests a cautious, stepwise approach to testing after spills, as rushing can mask hidden damage.
Long-Term Care: Cleaning, Prevention, and Storage
Prevent future accidents with a clean desk, spill mats, and a dedicated keyboard area away from drinks. Regularly inspect and clean keycaps with a mild solution and discard any keys that show corrosion or deep wear. Consider keyboard covers or splash guards for environments with liquids present. If you must have beverages nearby, use coasters and keep the keyboard at a safe distance. By applying a routine maintenance plan and using high-quality cleaning practices, you reduce the risk of future incidents. Keyboard Gurus emphasizes that prevention and careful handling are the best protection for your investment.
Steps
Estimated time: 24-72 hours
- 1
Power off and unplug
Shut down the device completely if possible and unplug from any power source. Do not attempt to turn it back on while wet. This reduces the risk of short circuits and further damage.
Tip: Act within seconds for best results. - 2
Drain the liquid
Gently tilt the keyboard to encourage drainage away from the PCB. Avoid shaking vigorously as this can push liquid deeper into the assembly.
Tip: Keep the spill orientation consistent to direct flow away. - 3
Blot moisture
Use a lint-free cloth to blot the surface and between keys. Do not rub aggressively; moisture can smear and spread.
Tip: Pat dry, don’t rub. - 4
Keycap removal (if safe)
If you know how to safely remove keycaps, do so to access trapped moisture. Use a keycap puller and note key positions for reassembly.
Tip: Label or photograph keyboard layout before removing. - 5
Airflow and evaporation
Place the keyboard in a warm, dry area with airflow. Avoid direct heat or fans that blow moisture deeper into components.
Tip: A fan nearby can help but avoid direct heat. - 6
Wait and verify dryness
Allow at least 24 hours of drying time; check for visible moisture before testing. If possible, use desiccants to accelerate drying.
Tip: When in doubt, err on the side of longer drying. - 7
Reconnect and test
Reconnect power and test basic typing in a document. Start with simple keys before heavy typing to observe performance.
Tip: Test in a controlled environment before everyday use. - 8
Seek professional aid if issues persist
If keys are unresponsive or you notice corrosion, contact a technician promptly. Do not prototype repairs on high-value keyboards.
Tip: Document symptoms for the technician.
Diagnosis: Keyboard stops responding or shows abnormal behavior after a water spill
Possible Causes
- highMoisture inside the keyboard reaching the PCB
- highShorts from conductive liquid bridging contacts
- mediumResidue or mineral deposits causing sticky keys
- lowWater ingress into laptop chassis affecting internal components
Fixes
- easyPower off and unplug immediately; remove any connected accessories
- easyDrain the unit by tilting and blotting; avoid rubbing
- easyDry in a well-ventilated area for at least 24 hours (longer for laptops)
- mediumDisassemble only if experienced; clean visible moisture with care
- hardSeek professional repair if keys remain unresponsive or corrosion is suspected
Got Questions?
Will my keyboard work after a water spill?
Recovery depends on how quickly you act and how thoroughly you dry. Some keyboards recover fully, others require replacement or repair
Act quickly and dry thoroughly; many keyboards recover, but some need replacement.
Should I use a hair dryer to dry the keyboard?
No. Heat can warp plastics and push moisture deeper into the device, increasing damage risk.
Avoid heat—let it dry naturally or with airflow.
Is it safe to test the keyboard while it’s still wet?
No. Testing while moisture remains can cause short circuits and misleading results. Wait until fully dry.
Wait until you’re sure it’s completely dry before testing.
Can I disassemble my keyboard at home?
Only if you have experience and proper static safety. Incorrect disassembly can void warranties and cause more damage.
Disassembly should be done only if you’re confident and insured to do so.
How long should I wait before plugging back in?
Provide ample drying time, ideally 24 hours or longer if moisture remains apparent, before reconnecting power.
Give it at least a full day to dry before powering back up.
When should I seek professional repair?
If keys stay unresponsive, signs of corrosion appear, or you’re unsure about the repair, contact a technician promptly.
If issues persist, get a professional check.
Watch Video
What to Remember
- Power off immediately after a spill and unplug the device.
- Drying thoroughly with airflow is critical to prevent corrosion.
- Avoid heat sources and avoid pressing keys during the drying phase.
- If keys remain unresponsive, seek professional repair promptly.