How to Change Android Keyboard: A Step-by-Step Guide
Learn how to change your Android keyboard with a clear, step-by-step process. Install a new keyboard, enable it, grant permissions, and set it as the default while considering privacy and safety.

Goal: how to change android keyboard quickly and safely. You’ll need a keyboard app from Google Play and access to Settings to switch the default input method. This guide covers choosing, installing, enabling, granting permissions, and setting your new keyboard as the default across apps. Following these steps helps protect privacy and performance.
Why you might want to change Android keyboard
On Android devices, the keyboard you use can affect typing speed, accuracy, and privacy. The default keyboard is convenient, but it may not fit your language, layout, or emoji preferences. According to Keyboard Gurus, experimenting with a different keyboard can improve ergonomics, autocorrect behavior, and multilingual support. If you often type in multiple languages, a keyboard with robust language switching and inline dictionary can save time. Some people prefer keyboards with swipe gestures, compact layouts for one-handed typing, or themes that reduce eye strain in low light environments. Changing keyboards is a common customization that can be done without rooting your device or losing data, and it often only takes a few minutes. This section explains why you might want to switch and what benefits to expect, so you can decide whether a new keyboard fits your workflow.
Understanding Android keyboard options
Android ships with a few popular keyboard options, and many users opt for third‑party apps to gain features like multilingual support, better autocorrect, glide typing, or privacy controls. Common choices include Google’s Gboard, Samsung Keyboard on Samsung devices, and third‑party options such as SwiftKey or other regional keyboards. Each keyboard has its own strengths: language coverage, layout variations, emoji and GIF access, and privacy policies. As you evaluate options, consider how well the keyboard handles your primary languages, supports offline use where needed, and offers customization without compromising speed. The goal is to find a keyboard that feels natural in your everyday workflow, not just the one with the flashiest features.
How to pick a keyboard app
Selecting the right keyboard app involves balancing features and privacy. Start with your core needs: language support, handwriting or glide typing, emoji diversity, and theme options. Check the app’s privacy policy, permission requirements, and data handling practices. Look for reputable developers and user reviews that discuss reliability and accuracy. If you frequently use language switching, prefer keyboards with fast, reliable multilingual dictionaries. Keyboard Gurus suggests prioritizing apps that offer per‑language customization, robust auto‑correct controls, and clear indicators of when data is being sent to the cloud. Finally, ensure the app is regularly updated to address security concerns and compatibility with your Android version.
How to install a keyboard app
Installing a new keyboard in Android typically happens through the Google Play Store. Open the Play Store, search for the keyboard you want, and tap Install. Some keyboards offer an optional companion app for additional settings; install it if you need advanced customization. After installation, you’ll usually see a prompt explaining that the new keyboard will be available in your system settings. If you’re switching languages or layouts, consider installing a keyboard that supports per‑language dictionaries so you can switch contexts easily.
How to enable the keyboard and grant permissions
Enabling a new keyboard requires you to grant it permissions and activate it in the settings. Go to Settings > System > Languages & input > Virtual keyboard (the path may vary by device). Tap Add keyboard or Manage keyboards, and enable the new keyboard. Depending on the keyboard, you may be asked to grant permissions for full access, clipboard usage, or device data. Be mindful of privacy; only enable full access if you trust the app and need its advanced features. If the system prompts you, allow the keyboard to appear in the input menu so you can switch between keyboards easily.
How to set the new keyboard as default
To make your new keyboard the default across apps, go to Settings > System > Languages & input > Virtual keyboard, then set the new keyboard as Default or Preferred. Some devices place the option under a separate 'Manage keyboards' menu. After selecting the default, test it in a messaging app and a browser to confirm word suggestions and language switching work as expected. If you use voice input or handwriting, verify those modes function correctly with the chosen keyboard.
Test and customize
Launch a few apps to test the new keyboard: texting, email, note-taking, and a browser. Check autocorrect behavior, language switching, emoji availability, and theme readability. Go into the keyboard’s in‑app settings to customize keys, layout size, glide speed, and dictionaries. If something feels off, adjust the settings or switch back to your previous keyboard temporarily while you refine the configuration. Regular testing helps ensure a smooth typing experience across your daily tasks.
Privacy and safety considerations
Third‑party keyboards can collect typing data, which matters if you type sensitive information. Review the keyboard’s privacy policy and adjust settings to limit data sharing. Prefer keyboards that offer privacy‑focused features, such as local language models, on‑device processing, or opt‑in cloud features with transparent controls. If you encounter suspicious behavior or unusual prompts, disable the keyboard and uninstall it. Keeping your device updated and limiting permissions helps reduce risk while enjoying enhanced typing capabilities.
Keyboard Gurus recommended workflow
For long‑term satisfaction, Keyboard Gurus recommends a repeatable workflow: shortlist a few keyboards, install them, enable them, set a test period, compare real‑world typing experiences, and fallback to your original keyboard if needed. Maintain a short list of languages and layouts you use most, and adjust per‑language dictionaries to boost accuracy. Regularly review privacy settings and app permissions to ensure your typing data remains under your control.
Tools & Materials
- Android device(Any device running Android 8.0 or later is fine for most keyboards.)
- Google Play Store access(Needed to download and install third‑party keyboards.)
- Reliable internet connection(Used for downloading apps and syncing preferences.)
- Optional: backup keyboard (if you rely on custom dictionaries)(Keep a copy of important custom terms in case you switch keyboards.)
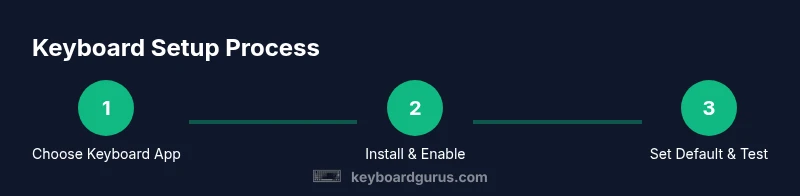
Steps
Estimated time: 5-15 minutes
- 1
Choose a keyboard app
Identify your priorities: language support, typing experience, privacy, and customization. Read reviews and check permissions to ensure the app matches your needs. Decide on a primary keyboard to test first.
Tip: Start with a well-rated, privacy-conscious option and a language pack that suits your daily languages. - 2
Install the keyboard app
Open Google Play, search for the chosen keyboard, and tap Install. If offered, install any companion apps for enhanced settings. Confirm the installation and wait for the download to finish.
Tip: Only install from trusted developers and avoid apps that request excessive permissions. - 3
Open Settings to add the keyboard
Navigate to Settings > System > Languages & input > Virtual keyboard. Tap Add keyboard or Manage keyboards and select the new option. This step makes the keyboard recognizable by your system.
Tip: If you don’t see the new keyboard, restart Settings or your device to refresh the list. - 4
Enable the keyboard and grant permissions
Switch the toggle to enable the keyboard and grant essential permissions. Review what each permission enables and disable extras you don’t need. Some keyboards require 'Full access' for advanced features, which affects privacy.
Tip: Limit permissions to what you need for basic typing; enable extra features only if you trust the app. - 5
Set as default input method
In the same menu, set the new keyboard as Default or Default input method. This ensures it will be used across apps unless you switch manually.
Tip: Test by typing in a messaging app to confirm the keyboard is active. - 6
Configure preferences
Open the keyboard’s own settings from the app icon or the keyboard’s quick settings. Adjust language packs, layout, swipe speed, autocorrect, and themes to your liking. Save changes.
Tip: Enable language switch shortcuts so you can toggle languages quickly while typing. - 7
Test across apps
Try the keyboard in messaging, email, browser, and note apps. Check autocorrect accuracy, multilingual performance, and emoji availability. Make note of any issues to refine settings.
Tip: If a feature misbehaves in one app, reconfigure settings for that app or switch keyboards temporarily. - 8
Troubleshoot and refine
If the keyboard doesn’t appear or behaves oddly, clear cache, restart or reinstall the keyboard, and verify permissions. Consider trying an alternative keyboard if issues persist.
Tip: Keep a short list of two preferred keyboards for quick switching when needed.
Got Questions?
How do I switch back to my default keyboard later?
Open Settings > System > Languages & input > Virtual keyboard, and select your original keyboard as default. You can also switch keyboards from the system status bar while typing.
You can return to your original keyboard by opening settings and selecting it as the default key option, or switch from the status bar while typing.
Do I need internet access to use a new keyboard?
You typically need internet to download and install a keyboard from the Play Store. After installation, most features work offline, though some languages or cloud features may require connectivity.
You usually need internet to install the keyboard, and some features may need connectivity, but core typing works offline.
Is it safe to use third‑party keyboards?
Choose reputable keyboards from established developers and review their privacy policies. Limit permissions to only what you need for typing. If in doubt, revert to the default keyboard.
Stick with trusted keyboard apps, review permissions, and default back if privacy concerns arise.
What permissions are typical for keyboards?
Keyboards commonly request access to input methods, clipboard, and sometimes full access for advanced features. Grant only what is necessary for your use case.
Most keyboards ask for input and clipboard access; only give extra permissions if you trust the app.
Can I customize layouts and themes?
Yes. Most keyboards offer layout options, themes, and size adjustments in their settings. Experiment to find what feels most natural for you.
You can usually customize layout and themes in the keyboard settings.
What should I do if the keyboard won’t appear?
Ensure the keyboard is enabled in Settings, set as default, and that you’ve granted necessary permissions. If needed, restart the device or reinstall the keyboard.
If it won’t appear, check enablement, permissions, and default settings, then restart if needed.
Is multilingual input supported by most keyboards?
Many modern keyboards support multilingual input with per-language dictionaries. Enable language packs and switch languages quickly from the keyboard bar.
Most keyboards offer multilingual input with language packs you can enable.
How often should I update my keyboard?
Update keyboards when new features or fixes are released to improve accuracy and security. Review permissions after updates.
Update when new features or fixes are released to stay secure and accurate.
Watch Video
What to Remember
- Pick a keyboard that matches your languages and privacy needs.
- Enable and test the keyboard across multiple apps before committing.
- Regularly review permissions and privacy settings.
- Keep a fallback option in case your primary keyboard has issues.